To configure Image Watermarking, go to HighGround → Settings, then click the Images tab and scroll to “Watermarking.”
Image Watermarking automatically overlays your logo on every image displayed on your site. It protects your visual content from uncredited reuse, reinforces your brand on shared and embedded images, and works without permanently altering your original media files.
Why Watermark Your Images
Original images get scraped, hotlinked, and reshared constantly. Without a watermark, there’s no visible connection back to your site once an image leaves your pages. A subtle logo overlay keeps your brand attached to every image, even when it shows up on Pinterest, in a competitor’s blog post, or in an AI training set. It also signals to visitors that your content is original, not stock filler.
How It Works
When a visitor loads a page on the frontend of your site, HighGround composites your uploaded logo onto each image at the position, size, and style you’ve configured. The watermark is applied at render time, meaning your original images in the Media Library and in the post editor stay completely untouched. If you change any watermark setting or remove the watermark entirely, every image on your site updates immediately.

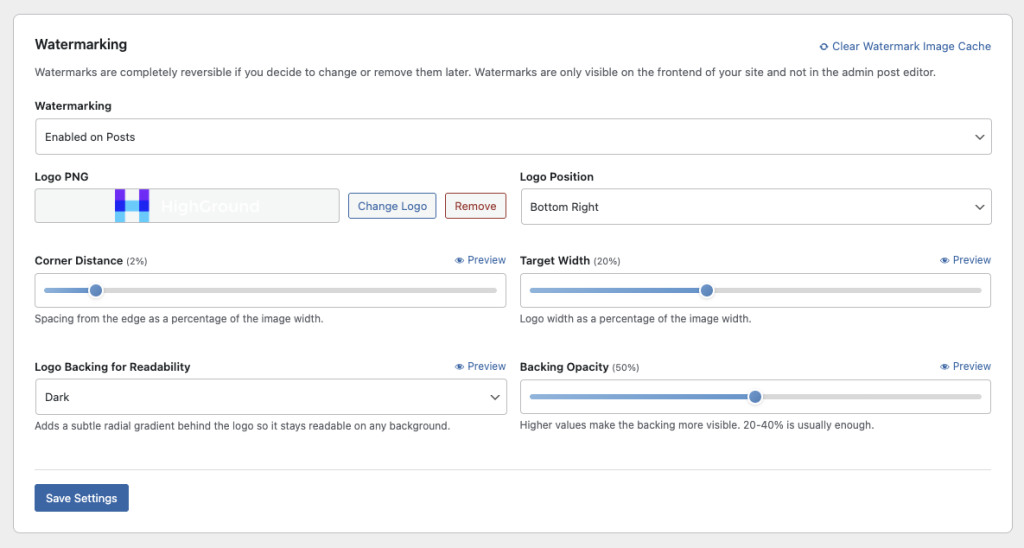
Logo PNG
Upload the image you want used as your watermark. This should be a PNG file with a transparent background so it layers cleanly over any image. Click “Change Logo” to swap it out or “Remove” to delete it. The watermark feature requires a logo to be uploaded before it will take effect.
Logo Position
Controls which corner of the image the watermark appears in. Options are:
- Bottom Right - The default and most common placement. Stays out of the way of the main subject while remaining visible.
- Bottom Left - Good if your images tend to have important detail in the bottom-right area.
- Top Right - Places the logo above the fold on tall images that might get cropped in feeds.
- Top Left - Useful when other elements like text overlays already occupy the bottom of your images.
Corner Distance
Sets how far the logo sits from the edge of the image, measured as a percentage of the image width. The default is 2%. Increasing this value pushes the logo further inward from the corner. A small value keeps things tight and unobtrusive. If your images have borders, rounded corners, or vignette effects, bumping this up a few percent keeps the logo from overlapping those edges.
Target Width
Controls how large the logo appears, defined as a percentage of the image width. The default is 20%. This means on a 1000px-wide image, the logo would render at 200px wide, scaled proportionally. Go smaller for a subtle brand mark. Go larger if visibility and theft deterrence are more important than aesthetics.
Logo Backing for Readability
If your logo gets lost against certain backgrounds, the backing option adds a subtle radial gradient behind it. This ensures the watermark stays readable whether the image is light, dark, or busy. Options are:
- Light - A soft white glow behind the logo. Best when your logo is dark-colored.
- Dark - A soft dark glow behind the logo. Best when your logo is light-colored or white.
- None - No backing. Use this if your logo already has strong contrast or includes its own background shape.
Backing Opacity
When Light or Dark backing is selected, this slider controls how visible the gradient is. The default is 50%. Lower values (20-40%) produce a barely-there effect that just takes the edge off difficult backgrounds. Higher values make the backing more pronounced. For most logos, 20-40% is enough to ensure readability without drawing attention to the backing itself.
Reversibility and Visibility
Watermarks are completely reversible. If you change your logo, adjust the position, or disable watermarking entirely, every image on your site reflects the change right away. There is nothing to undo on a per-image basis because the originals are never modified.
Watermarks are only visible on the frontend of your site. When you’re editing a post in the admin dashboard, images appear without the watermark so you can work with clean visuals. Visitors, search engine crawlers, and anyone viewing your published pages will see the watermarked versions.
Clearing the Cache
A “Clear Watermark Image Cache” button appears at the top of the Watermarking settings. HighGround caches the composited watermarked images for performance so your server isn’t processing every image on every page load. If you upload a new logo or change your watermark settings and don’t see the update reflected immediately, click this button to flush the cache and regenerate the watermarked versions.
How to Enable It
- Go to Settings → Images in HighGround. Scroll down to Watermarking and switch the dropdown from “Disabled” to your preferred scope:
- Enabled on Posts - Watermarks appear on images in blog posts only.
- Enabled on Pages - Watermarks appear on images in static pages only.
- Enabled on Both Posts and Pages - Watermarks appear everywhere.
- Upload your logo PNG, set your preferred position and sizing, then click Save Settings.
Cost Impact
Image Watermarking is entirely free. It runs locally on your server and does not use any AI credits, API calls, or external services. The only resource it uses is a small amount of server-side processing to composite the images, which is cached after the first render.
Saving
Click Save Settings to apply your changes. Watermarks will appear on the frontend immediately for new page loads. If you’ve changed your logo or settings and cached images are still showing the old watermark, click “Clear Watermark Image Cache” to force a refresh.